As enthralling as riding dirt bikes is, it comes with its fair share of risks. Due to the terrain, the bikes run on rocks and other unwanted things lying around, sometimes the biker has to stop the bike immediately. This is where the clutch comes in. But the clutch needs to be adjusted if it doesn’t work properly.
Adjusting the dirt bike’s clutch requires the owner to follow a few steps. These include uncovering the clutch, removal of the bike pedal, adjusting the cable, etc. The steps I am about to mention below, require patience, so it is advised not to hurry too much which will do more harm than good.
Let’s take a detailed look at how to adjust the clutch on a dirt bike and other related details.

Adjusting the dirt bike clutch
The clutch is one of the most important parts of a bike or any motorized vehicle for that matter. The function of the clutch is to alter the power supplied to the wheels of the bike to change its speed or to stop it completely. So, when you are flying around the race circuit or the dunes and see a big rock in front of you that you can not go around, the clutch comes in… well, clutch.
So, for their good, one must know how to adjust the clutch on a dirt bike. To do this, they will need the following instruments:
- A set of wrenches
- Screwdrivers
- Tape measure
- Coins
- Adjuster set for the lock nut knob
- Socket set
- Pencil
- Tape measure
- Blocked wood
Once all the equipment is gathered, the adjusting method of the clutch of the dirt bike can be commenced.
1. Adjusting the round knob
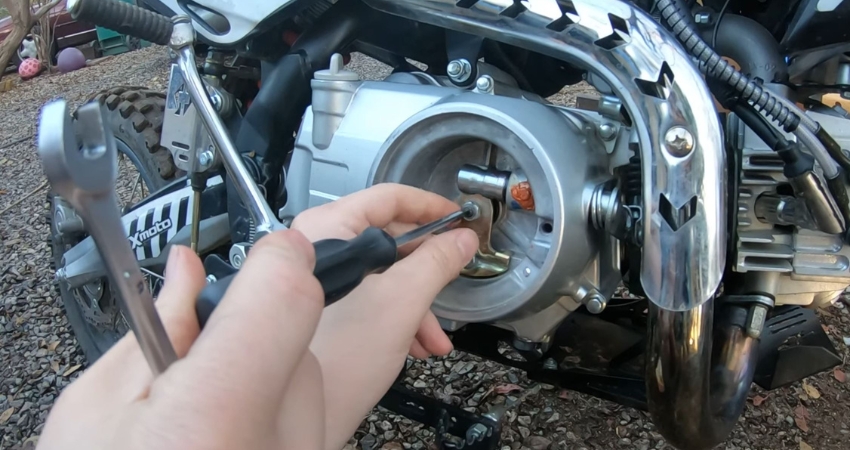
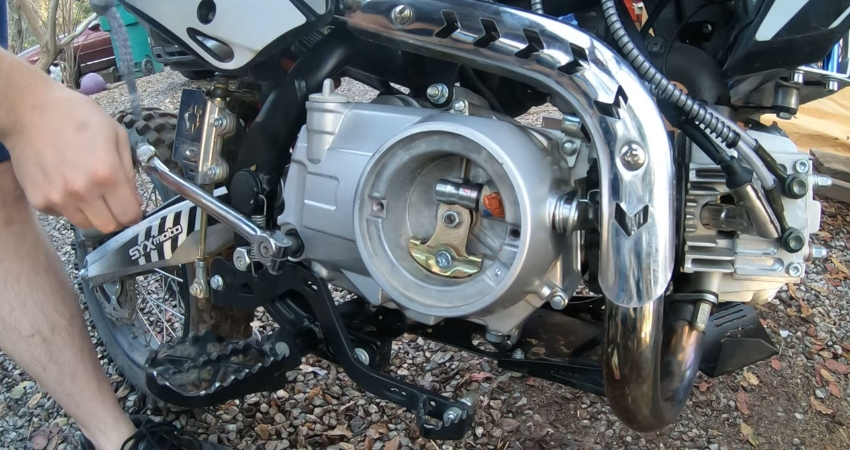
The first step in adjusting a dirt bike clutch is to adjust the round knob. The side cover and the clutch cover have to be removed. Then the clutch cable must be checked as moving the clutches of the dirt bike is often very difficult. This happens because the handle of the dirt bike freezes up and can not be shaken.

If the clutch cable is frozen, then the cable’s free play must be adjusted. To do this, first, the engine should be allowed to get cold or anyone who touches the bike will burn their hands. Then using a wrench, the round knob has to be changed into clutch perch. After that, the adjuster free play must be turned on and the lock nut knob has to be turned.
Once everything is done, the clutch’s movement has to be checked by repeatedly pushing in and out of it.
2. Calculating the distance between the clutches of the dirt bike and free play
If the clutch still doesn’t move, it’s time to adjust the lock nut. Using the adjuster set, the lock nut that is situated on the lever of the clutch has to be loosened and kept that way. If someone wants to know the proper way of adjusting the clutch on a dirt bike, they have to do this because it is a standard step of doing so.
The recommended distance between the free play and the clutch is given on almost every dirt bike out there. Using a measuring tape, it must be made sure that the said distance is between ⅛ to ⅜ inches. Then it has to be checked whether the clutch is still a little bit too tight against its perch. If that is indeed the case, the parts must be adjusted as soon as possible.

The clutch cable must be able to be slacked inside the grip otherwise the clutch will not fully engage. Using a coin or a nickel is a great way to pull the cable properly. Then the adjuster has to be backed off 3 times. When some resistance is felt, it should be backed off a quarter of a turn.
The reason a clutch cable shouldn’t be too tight is that a cable that is too tight will slip because of a half-engaged clutch.
3. Checking the swivel and the hydraulic pressure
The hydraulic pressure has to be checked before any final adjustments are made to the clutch. The best way to do this is to remove the hydraulic line and see if the clutch pressure is lost. If so, it’s a must to bleed it completely. This part is easy if gravity is allowed to do its work.
If the bleeder is opened on the slave cylinder and hydraulic oil is poured inside the reservoir, the air below the bleeder will continue to go out. The oil has to be kept flowing until all the air is drained from the bleeder.
Then it is time to see whether the hydraulic clutches and the grips are properly engaged with each other. If any one of the bores of either the master cylinder or the slave cylinder is stuck, then the piston which participates with the aforementioned bore freezes up.
The hydraulic system leaking is yet another problem dirt bike owners have to deal with. If the fluid becomes contaminated, it also contaminates the reservoir. This in turn blocks the cylinder. If that is the case, it becomes very difficult to adjust or even replace the parts. To ensure the lever has at least 10-15 mm slack, the cable should be adjusted accordingly.
4. Removing the brake pedal
Once the condition of the hydraulic pressure is satisfactory, the auto clutches have to be checked. This is quite hard to do for a rookie, so getting professional help is suggested. Once the auto clutches are checked, using a screwdriver, the brake pedal has to be removed. The clutch cover should also follow suit.
5. Loosening up the adjustment knob
Let’s get into the nitty gritty of adjusting a dirt bike clutch. The clutch has to be uncovered to loosen up the adjustment knobs. Using a wrench is the best way to go about it. The knob has to be frequently turned in and out and this has to be done at least three or four times.
It is necessary to repeat this process until the adjustment is satisfactory. Once the free play between the perch and the lever becomes equal to nickel, the adjustment is over. The clutch must not be too tight to prevent slipping or heating up.
6. Loosening the lock
The lock must be loosened without doing so for the clutch. Most inexperienced people have trouble finding the lock nut. The easiest way to find it is to follow the manual of the vehicle. Almost all the manuals suggest that the nuts must be loosened no more than 10 millimeters, so it’s best not to fiddle with it too much.
Next, the screw should be tightened until resistance is felt. Once the lock nut is tightened, this part is done.
7. Adjusting the cable
As I mentioned earlier, the clutch cable should be around 10 to 15 mm away from the lever. After adjusting the cable accordingly, the engine oil can be seen dripping off. This happens when the screws or the cable are too tight or for any kind of corrosion.
Even if the oil does drip, it isn’t a matter of great concern, at least for the first few days. Things will only be a matter of headache only if the dripping continues for a few days after the adjustments are done.
To finish up the procedure, the nuts have to be loosened up and all the covers have to be put back in their places. Finally, the barrel nut of the clutch lever has to be adjusted so that the tension and free play are perfect.
Read More: How to replace dirt bike clutch
When is adjusting the dirt bike clutches necessary?
If there is one thing that is as important as the knowledge of how to adjust the clutch on a dirt bike is the knowledge of when to do it. Despite dirt bike clutches being made to last longer than other bikes, there will come a time when adjustments will be necessary.
The first instance where adjustments to the clutch have to be made is when the back tire seems to be unfit. Next, the chain and sprockets being in bad shape is yet another indicator of the necessity of clutch adjustment.
The next indicator is the bike will not stop as smoothly as before when clutches are engaged. Fourth, when the clutch is engaged, it will produce fiery smoke, which is almost always a negative sign irrespective of the situation. Finally, if the clutch is suffering from corrosion, it will come off the adjustment, which is undoubtedly a sign that adjustments are in order.
Final words
Dirt bikes are made to fly around with reckless abandon. Having a faulty clutch will not only hamper its performance but will also put the well-being of the biker at risk. Also, the scarcity of fuel around dirt bike race tracks is a major cause of concern. So, knowing how to adjust the clutch on a dirt bike and how to carry extra gas on a dirt bike will only make life easier for the bikers.
Also, removing wheel bearings for replacing them is a necessary skill to have for the regular maintenance of the bike. Combining all these will ensure the weekends spent on the dunes and the racetracks are worth everyone’s time.
